🚧 READ-ONLY MODE: Editing is currently disabled. Please browse only.
Description
Storyteller
The infamous pirates of belaern are rumored to have stashed away great treasures. To this day nobody has spoken of its whereabouts.
Story:
Walkthrough
Very cool quest, though the reward isn't really that good
Bring:
- fish (one for each, or bring two tanis and one fish)
- shovel
- 150 plats
- Go to the Dolphin north of the Volcano on Isle of Belaern
- 'give fish to dolphin' to get transferred to the sunken galleon
- ne, search papers (you will find a key)
- Go to the fake Captain Sorgi (First Mate's cabin)
- ne, ne, ne, push board, ne, e, s, e, e, sw, e, s, sw
- punch hollow, s, e, se, e
- look map (you will see a map, but not be able to understand it)
- sw, e, e, e
- bribe guard (you will get teleported to another room east of this one)
- look wall (this will allow you to understand the map)
- w, nw, w, n, u, ne, n, w, ne, w, w, n, w, ne, w
- search water
- e, sw, e, s
- jump pool (this will teleport you to the hidden island)
- This island doesnt have normal exits, and is a little bit like Quest 69 - The Abyss and Quest 285 - Militant of the Keep/Quest 286 - Militant of the Citadel.
- You will first perform certain exits (without actually moving) a certain amount of times, then after that, the rooms will have exits, but most of them will take you back to the start
- 10n, 12w (you should now see northwest and east exits)
- nw,ne,nw,ne,nw
- search rock
- ne,nw,ne,nw
- leap cliff
- w,s,w,n
- hold shovel
- dig sand
- this solves the quest
- unlock chest
- wooden chest
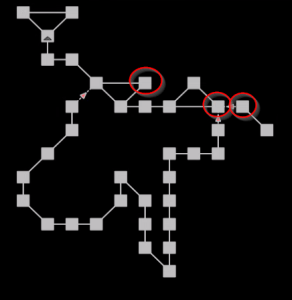
Map
In the cavern different from the rest
to start ye on a pirate's quest
with sparkling walls of crushed sea shell
where squabbling pirates long since fell
looking around at a room of wonder
your thoughts stray in dreams of plunder
with a leap of faith... a little skill
and but a dozen pirates to kill
10 paces north then 12 to the west
5 side-stepping-zigzags, one leaping test
skip twice to the left then once to the right
land in front of the stone called 'devil's delight'
once more to the north, now don't get caught
and if all goes well, X marks the spot
Missions
- 2 You discover a stack of maps, but the images are unclear to you.
- 3 One of the pirate guards has offered assistance for the right price.
- 4 Now you know the key to deciphering which map you will need.
- 5 You have discovered the map with the location to the treasure. You think you should find a shovel next.
- 6 Now that you have a shovel and the map its time to find this hidden isle.
- 7 You discover a strange key that could possibly open the treasure you seek.
Credits: Daniel A Wall II